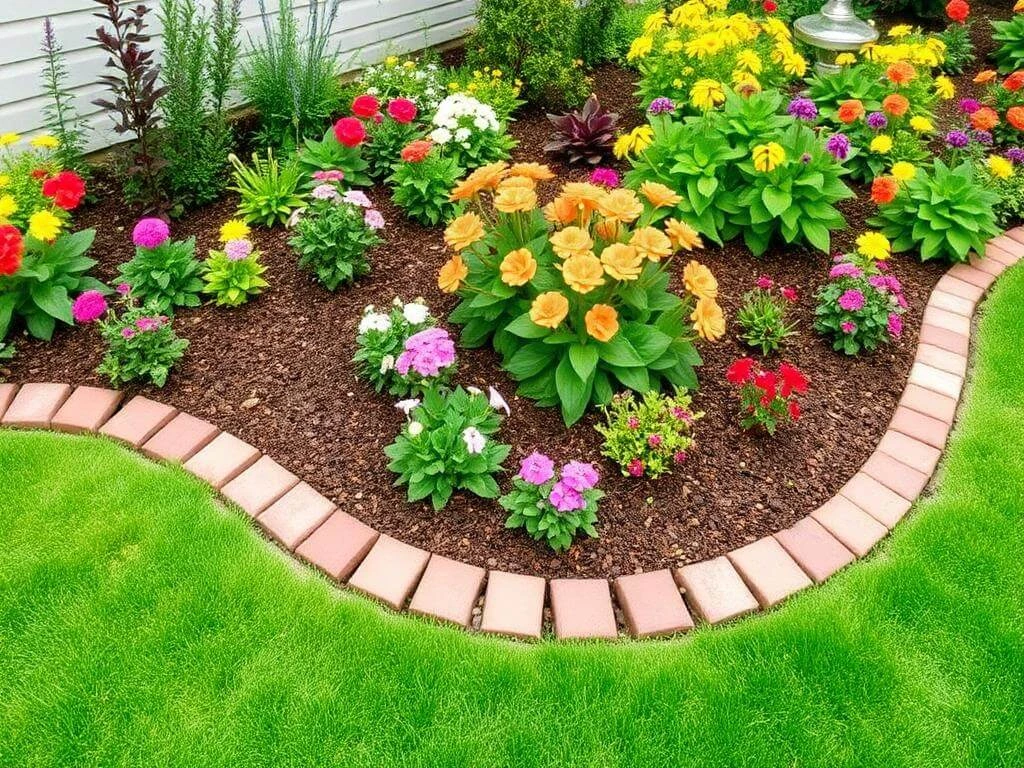
Creating beautiful garden edges is a simple yet impactful way to enhance your outdoor space, and landscaping bricks are the perfect material for the job. Known for their durability, versatility, and timeless aesthetic, these bricks can transform any garden into a well-defined, polished haven. Whether you’re aiming to add structure to flower beds, create walkways, or frame your lawn, landscaping bricks offer a practical and attractive solution. In this guide, we’ll explore why they are an excellent choice, the tools and materials you’ll need, and step-by-step instructions to help you build stunning garden edges with ease.
1. Why Choose Landscaping Bricks for Garden Edges?
When designing or upgrading your outdoor space, choosing the right materials for garden edges is crucial. Landscaping bricks stand out as one of the most popular options for several reasons. Their versatility, aesthetic appeal, and long-lasting nature make them a top choice for homeowners and landscapers alike. Here’s a closer look at why landscaping bricks are perfect for garden edging:
a. Durability and Longevity
Landscaping bricks are built to last. Whether exposed to harsh sunlight, heavy rain, or freezing temperatures, these bricks maintain their integrity over time. Their resistance to cracking and weathering makes them a reliable choice for garden borders. This durability ensures that your garden edges not only look stunning but also remain functional for years to come.
b. Aesthetic Appeal
One of the greatest advantages of landscaping bricks is their ability to elevate the visual appeal of any garden. Available in various shapes, sizes, colors, and textures, bricks can be used to create garden edges that complement your overall landscape design. Whether you prefer a rustic, natural look or a sleek, modern edge, landscaping bricks can adapt to your vision.
c. Versatility in Design
From straight borders to curved edges, landscaping bricks provide endless design possibilities. They can be laid in different patterns, such as stacked, staggered, or herringbone, allowing you to add a unique touch to your garden. Their adaptability makes them suitable for defining flower beds, pathways, or even separating different areas of your yard.
d. Eco-Friendly Option
For environmentally conscious homeowners, landscaping bricks offer an eco-friendly solution. Many bricks are made from sustainable or recycled materials, reducing their environmental impact. Additionally, they are reusable, so if you decide to redesign your garden, you can repurpose the bricks instead of discarding them.
By choosing landscaping bricks for your garden edges, you’re investing in a durable, visually appealing, and versatile solution that will enhance the beauty and functionality of your outdoor space. These qualities make them a standout choice for anyone looking to elevate their landscaping game.
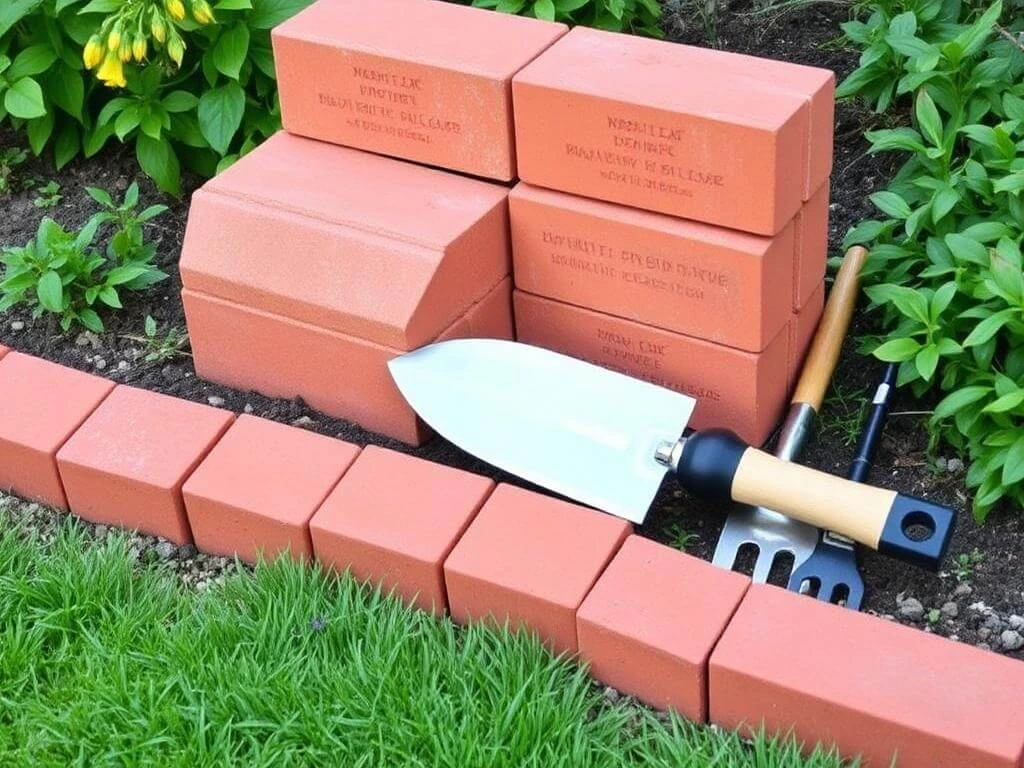
2. Tools and Materials Needed for Brick Edging Projects
Setting up stunning garden edges with landscaping bricks requires the right tools and materials to ensure the project is efficient, sturdy, and visually appealing. Having everything ready before you begin makes the process smoother and helps you achieve professional-quality results. Here’s a detailed breakdown of the essentials:
a. Types of Landscaping Bricks
Choosing the right type of brick is the first step in your project. Popular options include:
- Clay Bricks: Known for their classic appearance and warm tones, these are perfect for traditional garden designs.
- Concrete Bricks: Durable and available in various shapes, sizes, and colors, concrete bricks suit modern and contemporary styles.
- Decorative Bricks: Add a unique touch with textured or patterned bricks that make your garden edges stand out.
b. Essential Tools
To properly install your landscaping bricks, you’ll need the following tools:
- Trowel: For spreading and leveling mortar or sand.
- Mallet: To gently tap bricks into place without causing damage.
- Level: Ensures your bricks are evenly placed for a polished, professional look.
- Shovel: For digging and preparing the ground where the bricks will be laid.
- Measuring Tape: For accurate measurements to avoid gaps or misalignment.
c. Additional Materials
These materials help ensure the stability and durability of your brick edging:
- Mortar or Adhesive: Used to secure the bricks in place and provide a long-lasting bond.
- Gravel and Sand: Act as a stable base layer to prevent bricks from shifting or sinking over time.
- Edging Stakes or String Line: Help guide the layout and keep your edges straight during installation.
d. Safety Gear
When working with landscaping bricks, safety should always be a priority. Equip yourself with:
- Gloves: Protect your hands from cuts, abrasions, and rough brick surfaces.
- Goggles: Shield your eyes from dust and debris during cutting or digging.
- Knee Pads: Provide comfort and protection when working on the ground for extended periods.
Having the right tools and materials on hand ensures that your brick edging project will not only look great but also last for years to come. By carefully selecting and using the appropriate items, you’ll make the process of working with landscaping bricks both enjoyable and rewarding.
3. Step-by-Step Guide to Building Garden Edges with Landscaping Bricks
Building garden edges with landscaping bricks is a straightforward yet rewarding DIY project that can significantly enhance the structure and appearance of your outdoor space. By following a few simple steps, you can create clean, professional-looking garden borders that will last for years. Here’s a step-by-step guide to help you through the process:
a. Planning and Measuring Your Edging Area
The first step in any successful brick edging project is careful planning. Start by deciding where you want to place your garden edges and how they will fit into the overall design of your yard.
- Measure the Area: Use a measuring tape to define the length and shape of your edging. Mark the boundaries with stakes and string, ensuring that the lines are straight or curved as per your design.
- Determine the Height of Your Edging: Decide how high you want your bricks to stand. Most garden edges are about 3-5 bricks high, but this can vary depending on your aesthetic preferences.
b. Preparing the Ground
Once your design is planned, it’s time to prepare the ground where the landscaping bricks will be laid. Proper ground preparation is essential for a stable and long-lasting edge.
- Clear the Area: Remove any grass, weeds, or debris from the area where the bricks will go. Use a shovel or hoe to ensure the area is clean.
- Dig a Trench: Using a shovel, dig a trench to a depth of about 4-6 inches (depending on your brick height). The trench should be as wide as the width of the bricks, allowing them to fit snugly.
- Level the Ground: Ensure the bottom of the trench is flat and level, as this will help the bricks sit evenly. Use a level to check for any uneven spots.
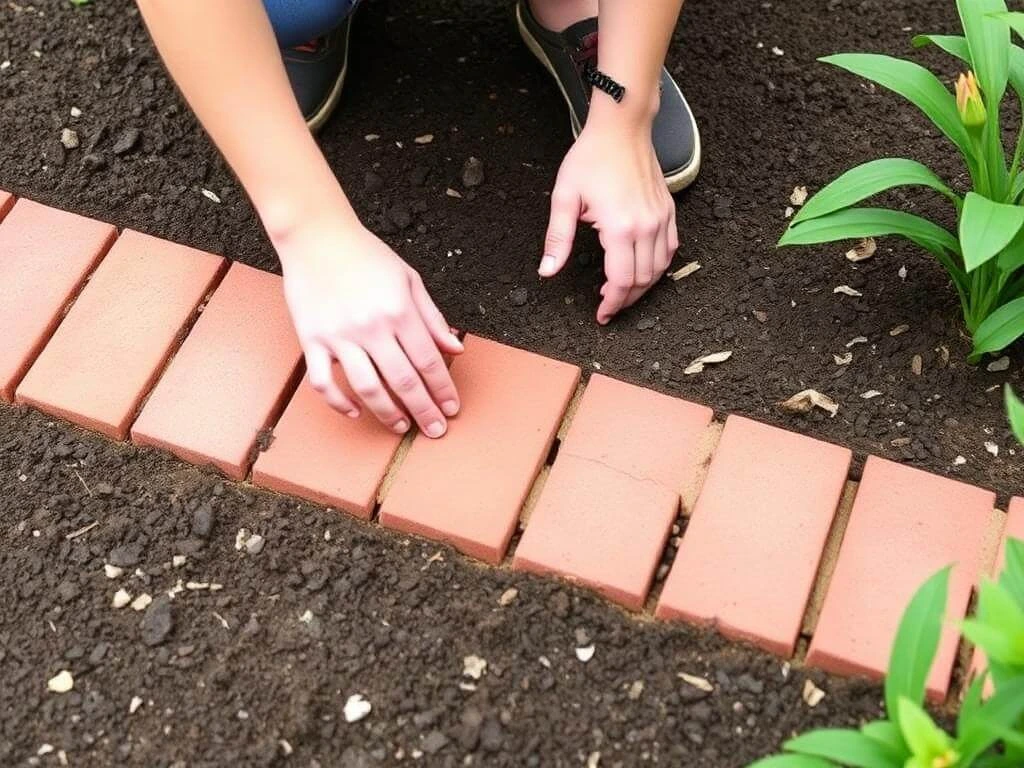
c. Laying the Bricks
Now comes the fun part—laying the landscaping bricks. Follow these steps to ensure the bricks are placed correctly.
- Start with a Base Layer: Lay a layer of gravel or sand at the bottom of the trench to help with drainage and provide a stable foundation for the bricks.
- Position the Bricks: Begin at one end of the trench and lay the bricks side by side, ensuring they are tightly fitted together. Use a mallet to tap each brick into place for a secure fit.
- Check Alignment: As you lay each brick, check that the edges are aligned properly with your measuring tape and string guide. This ensures your garden edges stay straight or follow the desired curve.
- Continue Layering: If you’re stacking the bricks for additional height, repeat the process by adding another layer of bricks, making sure each layer is tightly secured. Use mortar or an adhesive if needed to help bond the bricks together.
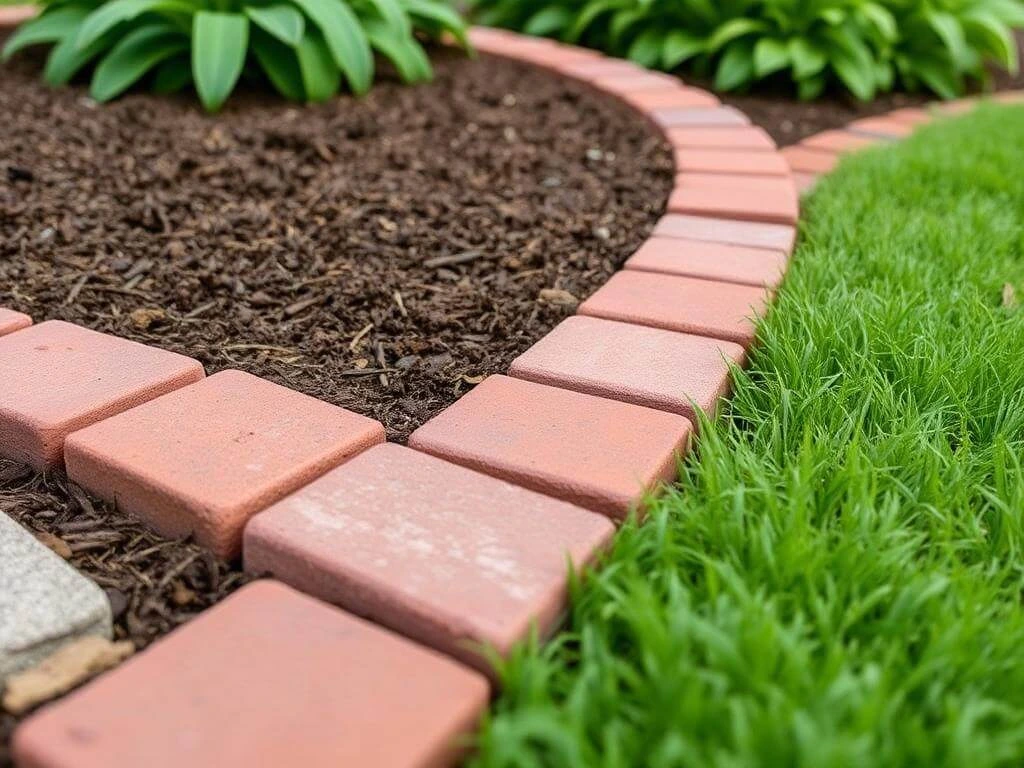
d. Finishing Touches
Once the bricks are in place, it’s time to finish up and add the final touches that will ensure the long-term stability and visual appeal of your garden edges.
- Fill in the Gaps: After laying the last layer of bricks, fill any gaps between the bricks and the trench with soil or sand. This will help hold the bricks in place and prevent any movement.
- Compact the Edging: Use a hand tamper or mallet to gently compact the bricks and surrounding soil to ensure the edges are secure.
- Clean Up: Remove any excess dirt or debris around the brick edging, and use a broom to clean the surface of the bricks. If you’re using decorative bricks, this will ensure their beauty shines through.
By following this step-by-step guide, you’ll create stunning garden edges with landscaping bricks that add both function and beauty to your yard. The key to a successful project is careful planning, preparation, and attention to detail, ensuring that your garden edges will remain durable and visually appealing for years to come.
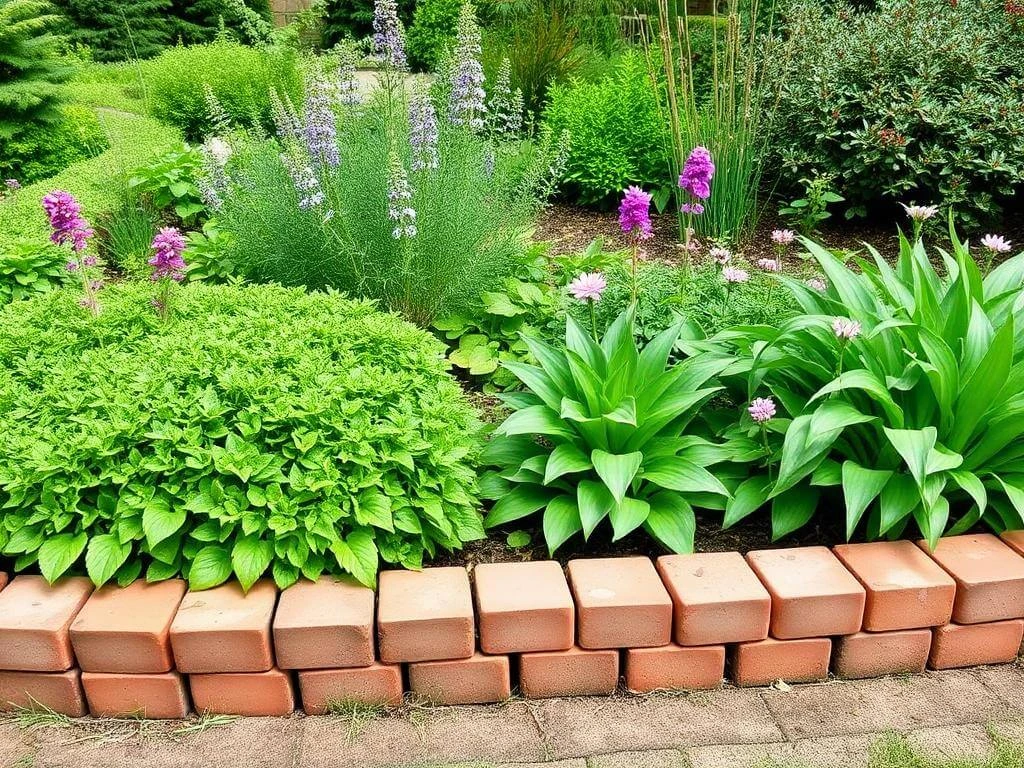
4. Creative Ideas for Landscaping Bricks in Garden Edges
Landscaping bricks are incredibly versatile, making them an ideal choice for creating unique and beautiful garden edges that reflect your personal style. By thinking outside the box, you can transform your outdoor space with creative brick designs that enhance your garden’s beauty and functionality. Here are several ideas to inspire your next garden edging project:
a. Patterned Brick Layouts
One of the best ways to make your garden edges stand out is by experimenting with different brick patterns. Instead of a standard straight line, use creative layouts to add texture and visual interest to your garden.
- Herringbone Pattern: This classic pattern creates a dynamic, woven effect that looks elegant and timeless. It’s perfect for adding a sense of movement to your garden borders.
- Basket Weave: This style alternates the placement of bricks, creating a checkerboard effect. It’s great for achieving a symmetrical, organized look.
- Running Bond: The most traditional brick layout, with each row of bricks staggered from the one below it. It offers a simple yet clean design, ideal for modern or rustic gardens.
These patterns can give your garden edges a unique and personalized touch, elevating the overall design.
b. Mixing Bricks with Other Materials
While landscaping bricks are beautiful on their own, combining them with other materials can create a striking contrast and add texture to your garden edges.
- Stone or Gravel: Place decorative stones or gravel in between the bricks to create a natural, earthy aesthetic. This works particularly well for rustic or Mediterranean garden styles.
- Wood: Add wooden edging or use timber posts alongside bricks to create a more organic, country-style look. The combination of brick and wood provides a perfect balance of structure and warmth.
- Metal or Steel: For a more modern approach, consider pairing bricks with metal or steel strips. This combination adds an industrial flair to your garden, creating sharp, clean lines that define the space.
Mixing materials in your garden edges not only enhances their appearance but also provides opportunities for customization.
c. Raised Garden Beds with Brick Edges
Using landscaping bricks to create raised garden beds is a fantastic way to add dimension and interest to your outdoor area. Raised beds help to separate different garden zones while also improving drainage and soil quality.
- Define Garden Zones: Use bricks to create elevated beds for vegetables, flowers, or herbs. This structure not only defines the space but also gives each section a unique character.
- Multilevel Edging: Stack bricks to create a tiered effect, where each level serves as a distinct section of your garden. This is ideal for sloped gardens or for creating a tiered flower bed with different plants at varying heights.
- Customizable Heights: Adjust the height of the raised beds depending on the design of your garden. Higher beds work well for areas that need more protection or visibility, while lower beds suit areas with more established plantings.
Raised beds with landscaping bricks can turn your garden into a structured, organized space that’s both functional and beautiful.
d. Colored Bricks for a Vibrant Look
If you want to add a pop of color to your garden, landscaping bricks come in a variety of hues, and you can experiment with different colors to create vibrant and eye-catching garden edges.
- Earthy Tones: Use natural-colored bricks, like terracotta or sandstone, for a rustic, earthy feel that blends seamlessly with plants and flowers.
- Bold Colors: Try using bold, contrasting colors such as red, blue, or even green bricks to create a striking border that draws attention. These colors work well in modern garden designs or to highlight particular plants or features.
- Mosaic Style: Incorporate a mosaic effect using different colored bricks within the garden edging to create a one-of-a-kind, artistic design. This approach adds a playful and personalized touch to your garden.
Using colored landscaping bricks gives your garden an instant facelift and can make a dramatic difference in the overall aesthetic of your outdoor space.
With these creative ideas, landscaping bricks can help you design garden edges that go beyond basic functionality, adding style, dimension, and personality to your outdoor areas. Whether you opt for classic patterns, mix in other materials, or incorporate bold colors, your garden edges can become a focal point that enhances the beauty of your landscape.
5. Maintenance Tips for Long-Lasting Landscaping Bricks
Proper maintenance of your landscaping bricks is essential to ensure that your garden edges remain durable, stable, and visually appealing over time. With regular care and attention, your brick edging can withstand weather changes, wear, and environmental factors while continuing to enhance the beauty of your outdoor space. Here are some maintenance tips to keep your landscaping bricks in top condition:
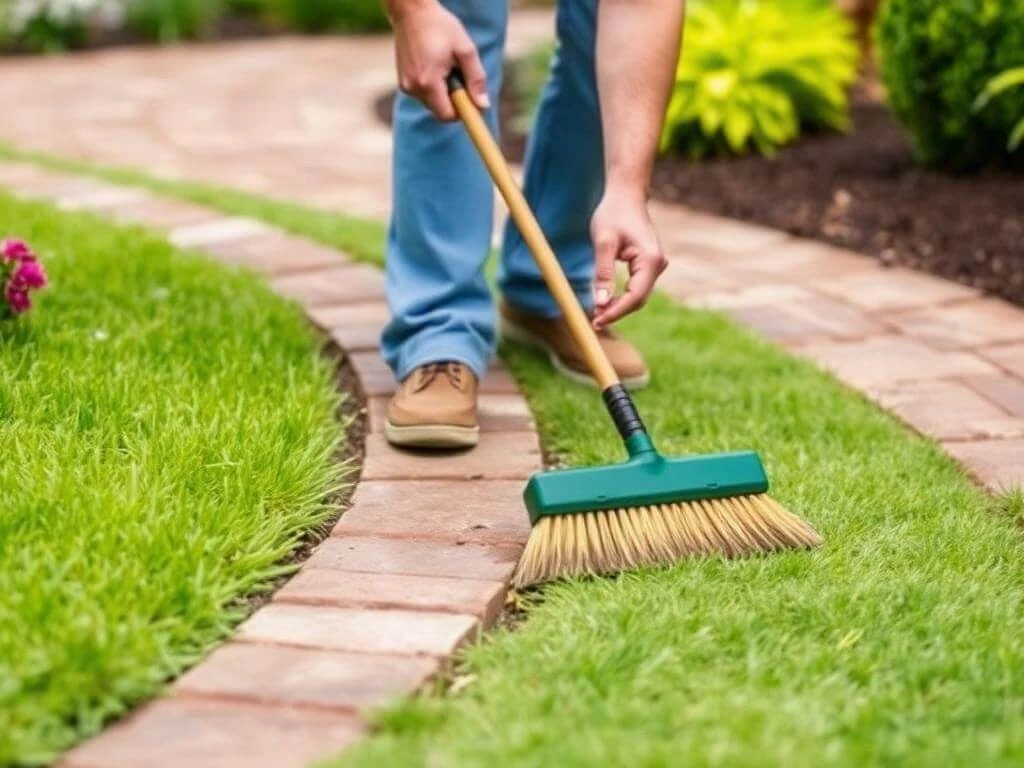
a. Regular Cleaning and Sweeping
Keeping your landscaping bricks clean is the first step in maintaining their appearance and preventing dirt and debris from accumulating.
- Sweep Away Debris: Use a broom to sweep the surface of your brick edging regularly. This will prevent leaves, dirt, and grass clippings from building up in the crevices and keeping your garden looking neat.
- Wash with Water: For deeper cleaning, hose down the bricks with water to remove any stubborn dirt or stains. Avoid using harsh chemicals, as these can damage the surface or discolor the bricks. If needed, use a mild soap solution for gentle cleaning.
- Pressure Washing: For more thorough cleaning, a pressure washer can be used to blast away dirt and grime. However, ensure the pressure setting is low to avoid damaging the mortar or dislodging the bricks.
Regular cleaning helps preserve the vibrancy of your landscaping bricks and ensures they remain an attractive feature in your garden.
b. Preventing Weeds and Vegetation Growth
Weeds and unwanted vegetation can quickly invade the gaps between your bricks, causing instability and making your garden edges look untidy. Keeping these at bay is essential for long-term maintenance.
- Apply Weed Barrier Fabric: Before laying your bricks, consider installing a weed barrier fabric underneath the edging to prevent weeds from growing up through the gaps.
- Regular Weed Removal: If weeds do appear, pull them out by hand or use a weed killer specifically designed for outdoor use. Avoid using harsh chemicals near your plants or garden soil.
- Seal the Gaps: Filling the gaps between your landscaping bricks with a mortar or polymeric sand can help keep weeds from growing. This also improves the stability of the edging and reduces the need for frequent weeding.
By preventing weed growth, you ensure your landscaping bricks remain secure and maintain a neat and tidy appearance.
c. Inspecting for Shifting or Damage
Over time, shifting or damage to the bricks can occur due to factors like soil erosion, extreme weather, or heavy foot traffic. Regular inspections will help you catch issues early and maintain the stability of your garden edges.
- Check for Shifting Bricks: After storms or heavy rain, inspect the alignment of your bricks to make sure none have shifted out of place. If any bricks are misaligned, carefully remove them, adjust the base, and replace them.
- Examine for Cracks or Chips: Inspect the bricks for any visible cracks or chips. If you notice any damaged bricks, replace them promptly to avoid further damage.
- Reapply Mortar: If the mortar between the bricks begins to weaken or erode, reapply it to ensure the edges remain solid and well-supported.
By regularly checking for any issues and addressing them immediately, you can prolong the life of your landscaping bricks.
d. Addressing Erosion and Settling
Soil erosion and settling around your landscaping bricks can cause them to sink, become unstable, or lose their alignment over time. Preventing or addressing these issues will keep your garden edges looking pristine.
- Add Gravel or Sand: If the ground around the bricks starts to erode, adding additional gravel or sand underneath and around the edges can help restore stability. This will also improve drainage and prevent shifting.
- Re-level the Area: If you notice that your bricks have sunk, carefully remove them, level the soil beneath, and reinstall the bricks. Ensure that the base layer of gravel or sand is even before placing the bricks back into position.
- Use Landscape Fabric: Installing landscape fabric beneath the gravel or sand base can further prevent erosion and improve the longevity of your brick edging.
By taking steps to prevent erosion and settlement, you can ensure that your landscaping bricks remain in place and continue to serve their purpose effectively.
e. Sealing the Bricks for Extra Protection
To help extend the life of your landscaping bricks, consider applying a sealant. This provides an extra layer of protection against the elements and keeps your bricks looking new for longer.
- Choose the Right Sealant: Select a sealant designed specifically for brick or stone surfaces. Opt for a product that protects against moisture, stains, and UV damage.
- Apply a Thin Coat: Follow the manufacturer’s instructions when applying the sealant. Use a brush or roller to apply a thin, even coat to the surface of the bricks.
- Reapply as Needed: Depending on the weather conditions in your area, you may need to reapply the sealant every few years to maintain maximum protection.
Sealing your landscaping bricks will help maintain their integrity, prevent discoloration, and extend their lifespan, ensuring they continue to enhance your garden for many years.
With these maintenance tips, your landscaping bricks will remain durable, stable, and beautiful. Regular care and attention will help you avoid common issues, and keep your garden edges looking neat and well-maintained, ensuring they stand the test of time.
Conclusion
Incorporating landscaping bricks into your garden edges is an excellent way to enhance the aesthetic appeal and functionality of your outdoor space. Whether you’re looking to create clean, defined borders, add creative patterns, or elevate your garden with raised beds, the versatility of bricks offers endless design possibilities. With the right tools, careful planning, and consistent maintenance, you can enjoy a beautiful and long-lasting garden edge that will remain a focal point in your landscape for years to come.
Remember, regular cleaning, preventing weed growth, and inspecting your brickwork for shifting or damage are key to preserving the beauty and durability of your landscaping bricks. By taking these steps and applying creative ideas, you can create a visually stunning garden that will be the envy of your neighbors. So, take the plunge and start your landscaping brick project today—your garden deserves it!