Landscaping lighting is one of the most effective ways to enhance the beauty and functionality of your outdoor spaces. You can transform a simple garden into a magical environment that shines day and night by carefully placing lights. Whether you’re looking to create a welcoming pathway, highlight architectural features, or add an element of security, landscaping lighting offers endless possibilities. This guide will walk you through everything you need about landscaping lighting, from design ideas to installation and maintenance, helping you illuminate your garden in style.

a. What Is Landscaping Lighting and Why Is It Important?
Landscaping lighting refers to the strategic placement of lighting fixtures in outdoor areas to enhance the appearance, safety, and functionality of gardens and landscapes. It involves a range of lighting techniques designed to create ambiance, highlight architectural features, and improve nighttime visibility. Landscaping lighting is not only about adding beauty but also about enhancing the usability of outdoor spaces after dark.
1. Importance of Landscaping Lighting
The significance of landscaping lighting goes far beyond mere aesthetics. Properly designed and implemented lighting transforms the outdoor environment, providing both practical and visual benefits. First, it helps to illuminate pathways, making your garden safer by preventing tripping hazards. For security purposes, well-lit exteriors deter trespassers and intruders, offering peace of mind for homeowners.
Additionally, landscaping lighting enhances the architectural and natural features of your garden. For example, accent lighting can be used to highlight a sculptural tree or a water feature, creating a focal point at night. By emphasizing these elements, landscaping lighting brings a garden to life after sundown, making it a truly engaging experience for anyone visiting.
2. Improves Aesthetic Appeal
The beauty of landscaping lighting lies in its versatility. It can be used to create various atmospheres, whether you desire a romantic, soft glow for relaxing evenings or bright, vibrant lighting for outdoor gatherings. By integrating a range of lighting options—such as spotlights, floodlights, and path lights—you can shape the mood of your outdoor space to match different occasions.
In summary, landscaping lighting offers an aesthetic and functional transformation that boosts safety, security, and the overall charm of your outdoor living area. Whether you’re looking to highlight features of your landscape, illuminate walkways, or simply add a touch of elegance, it plays an essential role in bringing your outdoor environment to life.

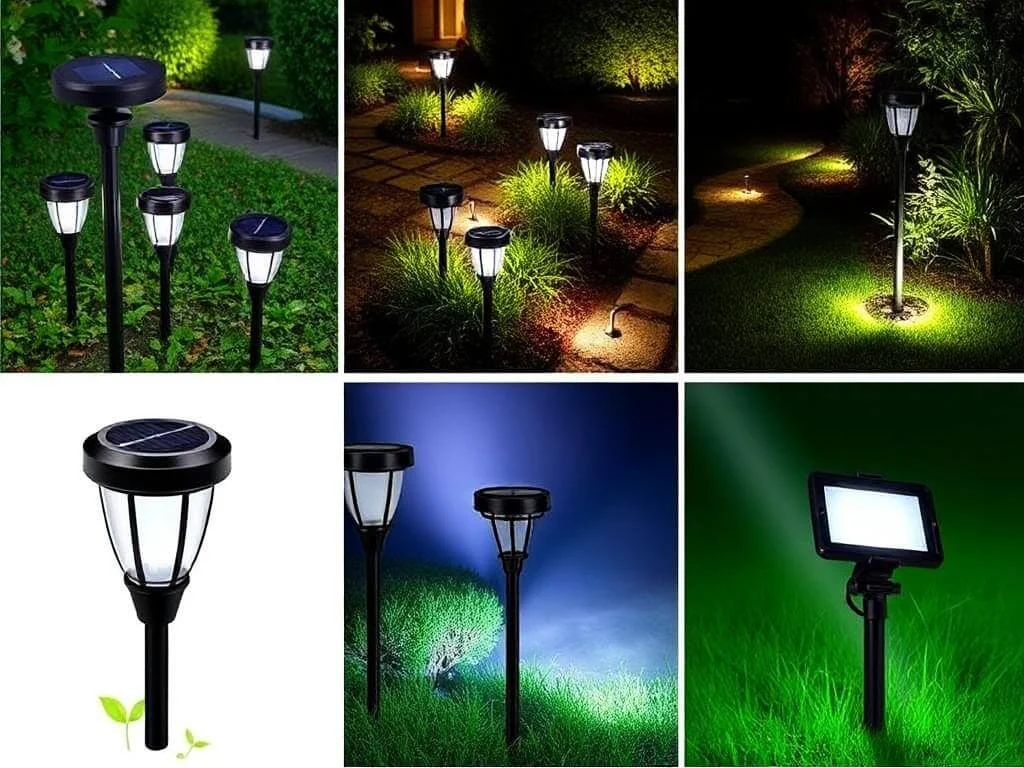
b. Types of Landscaping Lighting for Every Garden Style
When designing your garden’s lighting, it’s essential to choose the right types of landscaping lighting to complement your specific garden style. Each type of lighting serves a distinct purpose, from enhancing safety to creating a dramatic effect. Below are the most common types of landscaping lighting you can use to bring your outdoor space to life, ensuring your garden shines beautifully at night.
1. Pathway Lighting
Pathway lighting is a must for any garden that features walkways or driveways. These lights are designed to illuminate paths, guiding visitors safely through your garden and preventing accidents. Low-voltage or solar-powered path lights are commonly used in landscaping lighting, as they offer energy-efficient and cost-effective solutions. Path lights can be placed along garden paths, stepping stones, or around the edges of driveways to create a welcoming atmosphere. They not only provide functional lighting but also enhance the visual appeal of your garden at night.
2. Accent Lighting
Accent lighting is perfect for highlighting the most stunning features of your garden, whether it’s a beautiful tree, sculpture, water feature, or architectural element. By focusing light on specific objects, accent lighting creates focal points that add depth and drama to your outdoor space. You can achieve this effect using spotlights or well-placed uplights. This type of landscaping lighting is essential for showcasing the beauty of your garden’s unique elements, helping them stand out against the backdrop of your landscape.
3. Solar Landscaping Lights
Solar landscaping lights are an eco-friendly and low-maintenance option for homeowners looking to reduce their carbon footprint. These lights harness the power of the sun during the day and automatically turn on at dusk, providing illumination without the need for electricity. Solar-powered lights come in a variety of styles, such as stake lights, lanterns, and string lights, making them a versatile choice for any garden. In addition to being energy-efficient, they are easy to install and are ideal for gardens that are off the grid.
4. Floodlights and Spotlights
For more dramatic lighting effects, floodlights and spotlights are commonly used in landscaping lighting to illuminate larger areas or specific focal points. Floodlights cast a wide beam of light over large expanses of space, such as lawns, while spotlights concentrate light on smaller areas or specific objects. These lights are perfect for creating bold contrasts and enhancing the architectural features of your garden, such as a stone fountain or a prominent tree.
5. String Lights and Fairy Lights
String lights and fairy lights offer a whimsical and charming way to illuminate your garden. These lights can be draped over trees, fences, or pergolas to create a soft, glowing ambiance. String lights are often used in landscaping lighting to add warmth and romance to outdoor spaces, especially for evening gatherings or parties. They are also perfect for adding a touch of magic to garden parties or outdoor dining areas, making your garden feel like a cozy, enchanted retreat.
In conclusion, choosing the right types of landscaping lighting for your garden style is key to creating the desired atmosphere and highlighting your garden’s best features. Whether you prefer the practicality of pathway lighting, the drama of accent lighting, or the eco-friendliness of solar lights, there are many options to suit every garden design. By combining different types of lighting, you can achieve a beautiful, functional, and secure outdoor space.
c. How to Design a Perfect Landscaping Lighting Plan
Creating the perfect landscaping lighting plan requires a balance between aesthetics, functionality, and practical considerations. Properly designed landscaping lighting will enhance the beauty of your outdoor spaces while also improving safety and usability. Here’s a step-by-step guide to designing a lighting plan that will make your garden shine both day and night.
1. Assess Your Outdoor Space and Its Focal Points
The first step in designing a landscaping lighting plan is to evaluate your outdoor space. Take a close look at the layout of your garden and identify the key focal points you want to highlight. These could be architectural features like a gazebo, water fountains, or trees, as well as pathways and entryways. Understanding what makes your garden unique will help you determine where to place different types of lighting.
Consider how you use your garden throughout the day—whether it’s for relaxing, entertaining guests, or simply enjoying a quiet evening—and plan your lighting accordingly. Focusing on high-impact areas will ensure you achieve the best results with your landscaping lighting plan.
2. Choose the Right Lighting Fixtures for Specific Areas
Once you’ve identified your focal points, it’s important to select the right type of landscaping lighting fixtures for each area. Different fixtures will create different effects and serve various functions within your lighting plan. For example, use pathway lights to guide visitors along walkways, while accent lights will highlight specific objects like statues or trees. For larger areas, such as lawns or garden beds, consider using floodlights or spotlights to add drama and depth.
Solar-powered lights are an ideal option for environmentally-conscious gardens, offering both low-maintenance and energy-efficient lighting. Similarly, low-voltage lighting is a safe and effective choice for gardens where electrical wiring may be an issue. Always choose lighting fixtures that complement the aesthetic of your garden and meet the functional needs of each space.
3. Balance Aesthetics and Functionality
Achieving the right balance between aesthetics and functionality is key to an effective landscaping lighting plan. While you want to highlight your garden’s beauty, you also need to ensure that the lights serve practical purposes, such as providing enough illumination for walking paths or ensuring security. Overly bright or poorly placed lights can create unwanted glare or shadows, so it’s important to carefully consider the intensity and direction of your lights.
To achieve the perfect balance, think about layering your lighting. Use a combination of task lighting, such as path lights for visibility, with ambient lighting, like soft accent lights, to create a warm and inviting atmosphere. This approach not only makes the garden functional but also visually appealing.
4. Plan for Wiring and Power Sources
Once you’ve decided on the fixtures and areas for landscaping lighting, it’s time to plan for wiring and power sources. For those installing low-voltage or electrical lights, make sure you have a clear layout of where the wiring will go. Solar lights eliminate the need for complex wiring, but for more advanced installations, you may need an outdoor power source to support multiple lights. If you’re uncertain about electrical installations, it’s best to hire a professional to ensure safety and proper functionality.
If you’re working with an existing power source, keep in mind that too many lights on one circuit can cause issues, so plan your lighting layout accordingly. Consider using timers or smart outdoor lighting systems that can be integrated with your home automation system for added convenience and energy efficiency.
5. Test Your Lighting Plan
Before committing to your landscaping lighting plan, it’s a good idea to test your lighting setup. Temporarily place the lights in the desired locations and turn them on during the evening to see how they illuminate the garden. This will allow you to make any necessary adjustments, such as shifting light angles or adding additional fixtures for better coverage. Testing will also give you a sense of the ambiance created by the lighting and allow you to refine the design until it meets your vision.
In conclusion, designing a perfect landscaping lighting plan is about understanding your garden’s unique features, selecting the right lighting fixtures, and balancing aesthetics with functionality. By carefully planning your layout, choosing the proper lighting, and testing the design, you’ll create a visually stunning and practical outdoor space that shines with style. Proper planning is key to ensuring your landscaping lighting plan enhances the beauty, security, and enjoyment of your garden for years to come.

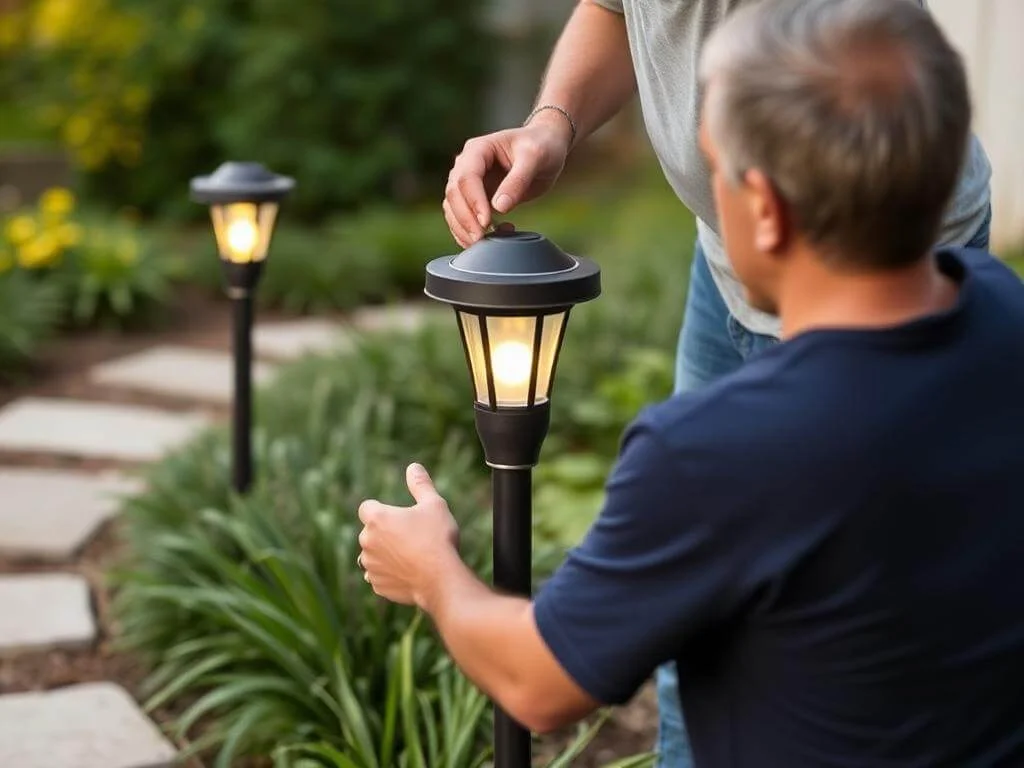
d. Installation Tips for Landscaping Lighting
Installing landscaping lighting can be a rewarding DIY project, but it’s essential to follow a few key tips to ensure the lights are set up safely and effectively. Proper installation not only enhances the beauty of your garden but also ensures that your landscaping lighting system works efficiently for years to come. Here are some essential installation tips to help you get the most out of your outdoor lighting design.
1. Gather the Necessary Tools and Materials
Before starting your landscaping lighting installation, make sure you have all the tools and materials you need. The most common items include the lighting fixtures, power cables, electrical connectors, stakes (if using path lights), a shovel or trenching tool for burying cables, and a multimeter for testing electrical connections. If you’re installing solar lights, you’ll also need the solar panel fixtures and stakes.
Additionally, if you plan to work with electricity (low-voltage or standard lighting), you may need to buy a transformer, outdoor-rated extension cords, and weatherproof electrical connectors. It’s essential to choose high-quality, weather-resistant materials for outdoor installations to prevent damage from the elements.
2. Plan the Layout and Mark Locations for Fixtures
Proper planning is crucial to ensure that your landscaping lighting layout is both functional and aesthetically pleasing. Use a tape measure to mark out the locations for each light fixture, ensuring they align with your design plan. Take into account the direction and spread of the light beams, as well as any potential obstacles like bushes or garden furniture that could block the light.
For pathway lights, make sure they are spaced evenly along the path to create a balanced and welcoming look. Accent lights should be positioned carefully to highlight focal points such as trees, sculptures, or water features. Be mindful of the height at which you place lights to prevent glare and ensure the lighting effect is as desired.
3. Install Low-Voltage and Solar Lighting Safely
Low-voltage lighting systems are a popular choice for landscaping lighting due to their energy efficiency and safety. When installing low-voltage lighting, it’s important to follow the manufacturer’s instructions to avoid overloading the transformer. Begin by connecting the lights to the transformer, making sure each connection is secure and protected from the elements. If you’re installing a solar lighting system, ensure the solar panels are positioned in a spot where they will receive ample sunlight during the day. Solar lights are easy to install—simply insert the stakes into the ground, and your lights will be ready to illuminate your garden at dusk.
For any electrical system, including low-voltage, make sure the wiring is properly protected. Use weatherproof electrical boxes and connectors, and if necessary, bury the wires underground to prevent damage from weather or garden activities. Always double-check the power connections to ensure everything is wired correctly.
4. Consider Safety Precautions and Proper Grounding
Safety should always be a priority when installing landscaping lighting, especially if you’re working with electrical systems. Before you start any installation, turn off the power to the area where you’ll be working, particularly when dealing with low-voltage or standard electrical systems. Make sure all connections are properly grounded to prevent electrical hazards. For any outdoor electrical work, it’s important to use outdoor-rated, weatherproof materials to keep your lighting system safe from water and moisture.
If you’re unfamiliar with electrical installations, consider hiring a licensed professional to handle the wiring and transformer installation. Proper grounding and wiring will ensure that your landscaping lighting operates safely, avoiding potential issues down the line.
5. Test Your Lighting System Before Finalizing
Once you’ve installed all the fixtures and wiring, it’s time to test your landscaping lighting system. Turn on the lights to check if they are functioning correctly and illuminating the desired areas. This is the perfect time to adjust the positioning of the lights, ensuring that beams aren’t obstructed and that each light is illuminating the right spots. For example, if a spotlight is too bright or pointed in the wrong direction, make the necessary adjustments to achieve the optimal effect.
Testing your system also allows you to check for any electrical issues, such as a light that isn’t turning on or a faulty connection. It’s essential to make sure everything is working properly before you finalize the installation.
In conclusion, installing landscaping lighting can be a straightforward and enjoyable process if you follow the right steps. By gathering the necessary tools, planning your layout, installing your lighting fixtures properly, and taking the necessary safety precautions, you can create a beautiful and functional outdoor lighting system. Proper installation ensures that your landscaping lighting will not only enhance your garden’s visual appeal but also provide long-lasting, reliable illumination for years to come.
e. Maintenance and Upkeep of Your Landscaping Lighting
Landscaping lighting is a fantastic addition to any garden, but like any outdoor system, it requires regular maintenance to ensure it continues to function optimally. Proper upkeep of your landscaping lighting system will not only extend its lifespan but will also keep your garden illuminated beautifully night after night. Here are some essential maintenance tips to ensure your lighting system remains in top condition.
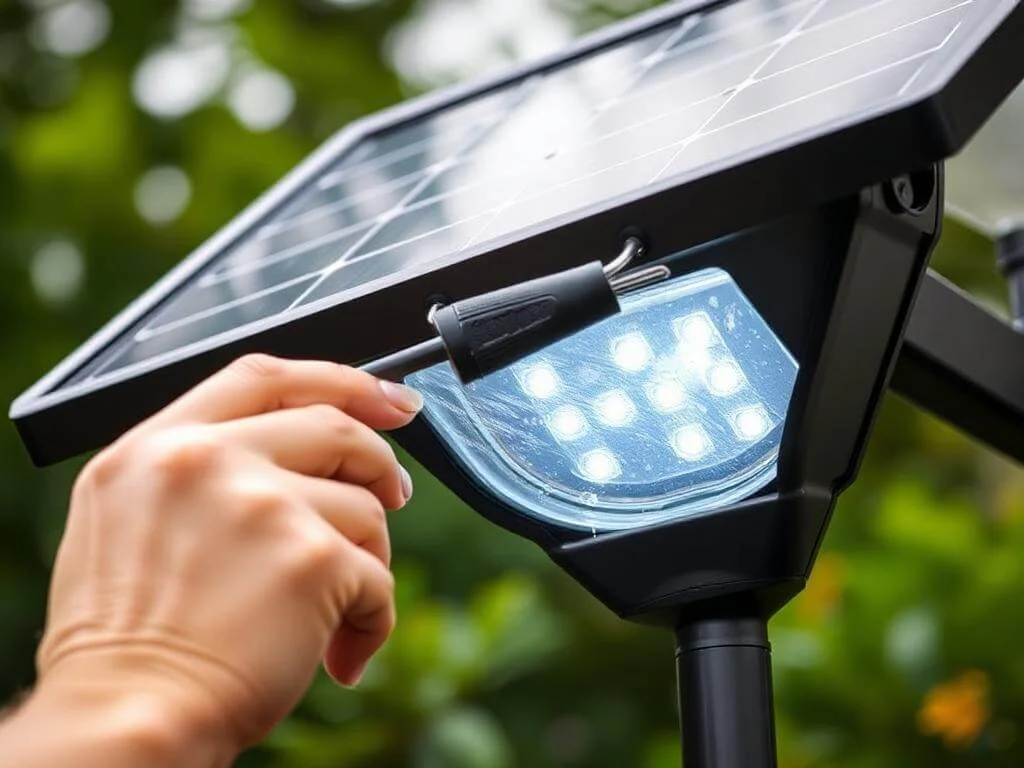
1. Clean Your Lighting Fixtures Regularly
Dust, dirt, and debris can accumulate on your landscaping lighting fixtures, dulling their brightness and affecting their performance. Regular cleaning is essential to maintain the beauty of your lighting and to ensure it casts the intended light effectively. Use a soft cloth and mild soap with water to clean the fixtures. For solar lights, it’s particularly important to wipe the solar panels clean regularly to ensure they continue to absorb sunlight efficiently.
Be cautious with cleaning tools, especially when working with glass fixtures or delicate parts. Avoid using harsh chemicals or abrasive materials that could damage the lights. Additionally, clean the light bulbs or LED components to remove any build-up of dirt that could block the light’s output.
2. Inspect and Replace Damaged or Burnt-Out Bulbs
Over time, bulbs in your landscaping lighting may burn out or become damaged, reducing the effectiveness of your lighting system. It’s important to regularly check your bulbs and replace any that are no longer working. With LED bulbs, which are common in landscaping lighting due to their energy efficiency, you may not need to replace them as frequently. However, it’s still essential to inspect all fixtures every few months to ensure everything is functioning properly.
If you notice any lights flickering or dimming, the bulb may need to be replaced or cleaned. For low-voltage systems, make sure to replace bulbs with the correct wattage to avoid overloading the transformer and causing further issues.
3. Check and Maintain Electrical Connections
For landscaping lighting systems that use wiring and transformers, it’s crucial to inspect the electrical connections regularly. Over time, exposure to weather can cause wires to loosen, corrode, or break, which could lead to malfunctioning lights or even complete system failure.
Inspect all wiring for any signs of wear, damage, or rodent activity. Ensure that connections are secure and free from rust or corrosion. For safety, always make sure that your power source is turned off before inspecting the electrical components. If you notice any frayed wires or broken connectors, replace them immediately. Proper maintenance of the electrical components will keep your landscaping lighting system running smoothly for years.
4. Ensure Proper Functioning of Solar Lights
If you’re using solar-powered landscaping lighting, the performance of the solar panel is a key factor in how well the lights work. Periodically check that the solar panels are not obstructed by leaves, branches, or dirt. Any debris that blocks the solar panel will reduce its ability to charge during the day, leading to dim or non-functioning lights at night.
Additionally, make sure that the panel is facing the right direction to maximize sunlight exposure throughout the day. If your solar lights are not illuminating as brightly as they once did, the battery inside may need replacing. Solar lights typically need a battery change every few years to maintain optimal performance.
5. Trim Overgrown Plants and Vegetation
Overgrown plants and vegetation can obstruct your landscaping lighting, preventing light from reaching the intended areas. Make it a habit to trim back any plants, shrubs, or trees that may have grown too close to your lighting fixtures. This is especially important for path lights, accent lights, and spotlights, which need clear lines of sight to illuminate the landscape effectively.
Trimming vegetation around your lights will also prevent any damage that could occur if branches or vines interfere with the wiring or fixtures. Keep your garden well-maintained to ensure the best performance from your landscaping lighting and preserve the aesthetic value of your outdoor space.
6. Reposition Lights as Needed
Over time, the landscaping around your lighting fixtures may change. Plants grow, flowers bloom, and the landscape evolves, which may affect how your lights illuminate your garden. It’s a good idea to periodically assess the placement of your lights to ensure they’re still serving their intended purpose.
If necessary, reposition path lights to better guide visitors or shift accent lights to highlight new features in your garden. As your garden matures, the lighting requirements may change, and adjusting your setup will ensure that your lighting plan remains effective. Repositioning your lights can also help avoid any obstructions that may have developed, ensuring optimal lighting performance.
7. Monitor for Signs of Wear or Weather Damage
The weather can take a toll on your landscaping lighting, particularly if you live in an area with extreme temperatures, heavy rain, or snow. Regularly check for any signs of weather damage, such as rust on metal fixtures, cracked glass, or corroded electrical components. Ensure that the wiring is not exposed to the elements, as water damage can cause short circuits or malfunctioning lights.
During the colder months, it’s a good idea to disconnect your lights if freezing temperatures are expected to avoid damage from frost or snow. For year-round durability, use weatherproof and corrosion-resistant materials when installing your landscaping lighting. The better the materials, the less maintenance they’ll require over time.
In conclusion, regular maintenance and upkeep of your landscaping lighting system are crucial for ensuring that it continues to function properly and enhance the beauty of your garden. By cleaning fixtures, replacing damaged bulbs, inspecting electrical connections, and maintaining solar lights, you can enjoy long-lasting, reliable outdoor lighting. Regularly assessing the condition of your system will help you identify any potential issues early on, ensuring that your garden remains well-lit and visually stunning for years to come.
Conclusion
Landscaping lighting is a powerful tool for transforming your garden into a stunning outdoor space. From highlighting architectural features and creating ambiance to improving safety and security, the right lighting can truly enhance the beauty of your landscape. Whether you opt for traditional low-voltage systems or energy-efficient solar lights, understanding the different types of lighting, designing a thoughtful plan, and maintaining the system properly will ensure that your garden shines brightly for years to come.
By following the tips and advice shared in this guide, you can confidently create a lighting design that fits your style and needs. Regular cleaning, timely bulb replacement, and proper installation and maintenance will keep your landscaping lighting in optimal condition. With a little care and attention, your outdoor space will continue to glow, making your garden the perfect place to relax and entertain under the stars.
Now that you have all the information you need, it’s time to start planning your landscaping lighting and turn your garden into a beautiful, well-lit oasis. Whether you’re tackling the installation yourself or hiring a professional, the right lighting plan can make all the difference in creating a welcoming and visually appealing outdoor environment. Happy lighting!